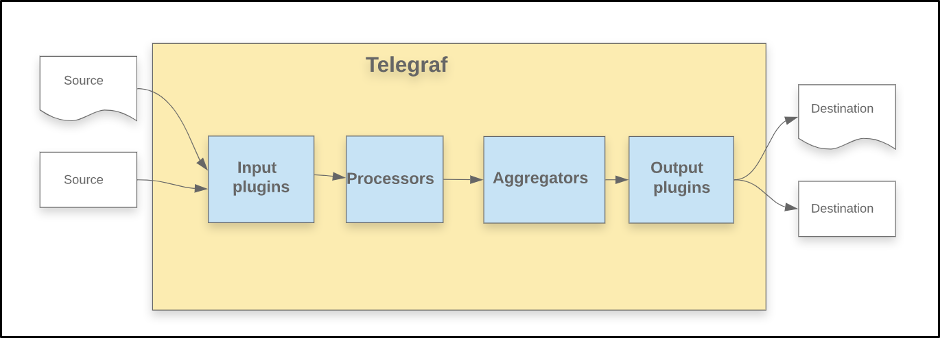
Integrating Modern Monitoring Tools with Legacy Systems:
Integrating modern monitoring tools with older systems can be a daunting task, especially when dealing with legacy software and hardware. However, tools like Telegraf and New Relic offer a robust solution to bridge this gap effectively. This guide is designed to help you set up comprehensive monitoring for both Windows Server 2008 R2 and SQL Server 2008 R2, enabling you to gain insights into your legacy systems with modern monitoring capabilities.
Why This Guide Matters:
Legacy systems, while reliable, often lack the advanced monitoring capabilities of modern software. Integrating these older systems with tools like Telegraf and New Relic allows you to:
• Gain Visibility: Understand system performance and health with real-time metrics.
• Improve Troubleshooting: Quickly identify and address issues before they impact operations.
• Ensure Compliance: Meet regulatory and internal standards for system monitoring and data collection.
By following this guide, you can enhance your monitoring strategy and ensure that your older systems are not left behind in the digital transformation.

Configuring Telegraf for Windows Server 2008 R2
Prerequisites
Before you begin the installation and configuration of Telegraf on Windows Server 2008 R2, ensure you have the following:
- Administrator Access:
Ensure you have administrator rights on the Windows Server 2008 R2 system where you will be installing Telegraf.
- New Relic Account:
A valid New Relic account is required to generate the API license key. If you don’t have one, sign up at New Relic’s website.
- Basic Command Prompt Knowledge:
Familiarity with using Command Prompt and executing commands with administrative privileges.
- Text Editor:
A text editor like Notepad++ or any editor of your choice for editing the Telegraf configuration file.
Installation and Configuration Steps
Download and Install Telegraf:
Download Telegraf:
Visit the Telegraf releases page on GitHub.
Download the 64-bit version 1.15.0 of Telegraf.
Create Installation Directory:
Open Command Prompt as Administrator (Press Win + R, type cmd, and press Ctrl + Shift + Enter).
Create a directory for Telegraf
Copy code
mkdir "C:\Program Files\Telegraf"
Extract Telegraf:
Extract the downloaded ZIP file into the directory you just created (C:\Program Files\Telegraf).
Generate New Relic API License Key:
Access New Relic Account:
Log into your New Relic account. If you don’t have an account, create one by following New Relic’s sign-up instructions.
Generate API Key:
Navigate to the API keys section within your account settings.
Generate a new API license key. This key will be used by Telegraf to send data to New Relic.
Configure Telegraf for New Relic:
Locate Configuration File:
Find telegraf.conf in the Telegraf installation directory (C:\Program Files\Telegraf).
Edit Configuration File:
Open telegraf.conf with a text editor like Notepad++.
Add New Relic Output:
Append the following configuration to enable output to New Relic:
Copy code
[[outputs.newrelic]]
insights_key = "ADD_YOUR_API_KEY"
metric_prefix = "telegraf."
timeout = "15s"
Replace ADD_YOUR_API_KEY with the API key you generated.
Test Configuration and Start Telegraf:
Open Command Prompt as Administrator:
Ensure Command Prompt is running with administrative privileges.
Navigate to Telegraf Directory:
Change directory to Telegraf installation path:
Copy code
cd C:\Program Files\Telegraf
Validate Configuration:
Run the command to test your Telegraf configuration:
Copy code
telegraf --config telegraf.conf --test
Address any errors that appear.
Start Telegraf Service:
Copy code
net start telegraf
Verify in New Relic
• Log into New Relic and navigate to the Metrics section. Search for “telegraf” to view the metrics collected from your Windows Server 2008 R2.
Conclusion:
By following this guide, you’ve integrated Telegraf with New Relic to monitor Windows Server 2008 R2. This setup provides valuable insights into your legacy system’s performance and helps you maintain operational excellence. Stay tuned for the next part where we will cover SQL Server 2008 R2 configuration.
Feel free to reach out with any questions or share your experiences in the comments below!